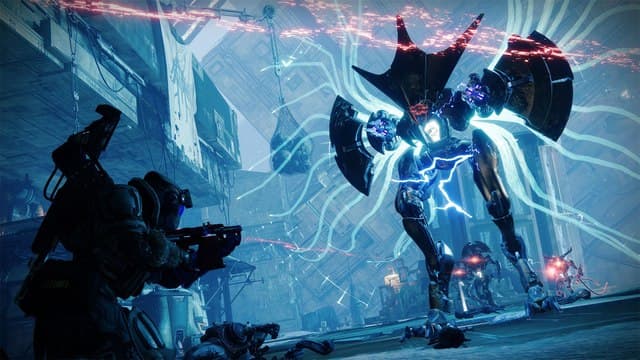
Destiny 2: Beyond Light is finally here after months and months of waiting. Acting as the next major chapter in this FPS/RPG hybrid, players will embark on a journey to Europa to battle against a Fallen leader called Eramis and learn more about the true nature of the Darkness. This expansion includes new characters, missions, endgame activities, weapons, and enemy types. But if you’re like me, the first thing you want is one of those fancy new exotic armor pieces that have been teased for weeks. Tied exclusively to Legendary and Master tier Lost Sectors, players will need to venture into these mini-dungeons alone if they want a chance at the new exotics.
This is easier said than done, as the Legendary Lost Sectors are at 1250 Light and filled with Champion tier enemies. So if you want to farm for exotic armorer pieces, I recommend going in at a minimum of 1230 Light. You can do it lower, but 1230 will give you a fighting chance. Additionally, I suggest unlocking all the champion mods for your artifact, because you’ll be making use of them throughout. Finally, these Lost Sector variants only appear once you’ve completed a normal run of that Lost Sector. There are three on Europa and two in the Cosmodrome, so do these first.
Perdition Loadout
Since your loadout is locked at the start you’ll want to make sure you have the right gear equipped. This can change a little as you obtain more Power, but here’s what I used during my farming runs.
- Subclass – Void
- Kinetic – Scout Rifle (Your Choice)
- Energy – Jian 7 Rifle
- Heavy – Anarchy
- Anarchy Alternatives – Xenophage, One Thousand Voices, Leviathan’s Breath
You will also want to equip the Overload Rounds (Scout Rifle) and the Anti-Barrier Pulse Rifle mod on one of your armor pieces. The rest of the mod slots are yours to customize but consider a way to become Charged With Light and the Protective Light mod. This will give you better survivability when your shield is cracked, which can be absolutely life-saving against Champions. I strongly recommend you bring Jian 7 into this since there are a ton of Harpies with Arc shields that you’ll need to pop. Plus, you can use Anti-Barrier rounds with it, allowing you to deal with Barrier Champions.
While Anarchy is the ideal choice, Xenophage, One Thousand Voices, and even Leviathan’s Breath are all solid alternatives. We need burst damage weapons to bring down the four Champions that spawn in this lost sector, so make sure you’re carrying one of these. As for your sub-class, Void is a solid option since you’ll need to break two void shields throughout. However, Solar or Stasis are alright here if you run the Thermal Overload and Surge Eater mod combo.
Remember, you will have three lives to start and you’ll gain a life for each Champion you kill. You want to kill all the Champions, as this increases the quality of rewards at the end. Also, if you take longer than 15 minutes, there will be no more respawning even if you have lives.

How to Beat Perdition on Legendary
Champion Number – Four (Two Overload/Two Barrier)
First Floor
When the Lost Sector begins, you will want to stay up on the balcony above the various Harpies and the Hydra patrolling below. Use your Heavy weapon and a grenade to damage the Hydra first, as it will teleport away after taking too much damage. This enemy hits very hard, so removing it from the equation will save you a lot of headaches when the Harpies start attacking. Make sure to not jump down and use the catwalk as cover when engaging the other Vex below you. Jian 7 will do a lot of work here, as it can break the shields and typically cause a chain reaction. After all the enemies are dead jump down and approach the next room to spawn another squad of Harpies and a red bar Minotaur.
Try to bait the Minotaur away from the Harpies so you can isolate and swiftly deal with it. Use either your melee or grenade to break the shield before taking it down. Once the Minotaur and wave of Harpies are destroyed, approach the small staircase. The moment you hear Vex spawning, turn around and run back behind the large, raised portion of the room. This will be your main cover during this fight, as there are two Hobgoblins, several Harpies, and an Overload Champion. If you can, use your Scout Rifle to kill the Hobgoblins first since they can be a nuisance. However, the second that Overload starts charging you, back up some more before using your Scout Rifle to stun it. Now use your Heavy to quickly kill this enemy before focusing back on the other Vex at the end of the room. Head up the stairs after everything is dead.

Second Floor
When you arrive on the second floor, you’ll want to use the stairs and wall to your left as cover. Running out into the room will most likely result in your death. Instead, shoot the second Overload Champion a few times to get its attention, then head down the stairs. When it charges, use the Scout Rifle to stun it and your Heavy weapon to destroy it. Once this enemy is dead, go back to the top of the stairs and carefully pick off the Fanatics and Goblins roaming. After they are dead, run into the room and then go immediately back to the top of the stairs.
You will spawn in two Barrier Champions, four Goblins, and two Wyverns. Focus on the Wyverns and Goblins first, retreating down the stairs to heal whenever you take damage. The Wyverns will typically chase you, so it’s okay to use your Heavy or Super on them to ensure they die. These enemies hit very hard, so never challenge them at close range. After those enemies are destroyed, move along the righthand wall to the next staircase and throw a grenade on the first Barrier Champion. Once its shield pops up, use your pulse rifle to break the barrier and then swap to your Heavy to quickly kill it. Repeat this for the second Barrier Champion in the next room causing the shield to lower and the boss to spawn.
This next portion is easy since the boss never pushes you and the only enemies that spawn are Goblins, Harpies, and two Hobgoblins when the boss hits 50% health. Just poke at it wither with your Scout Rifle or Heavy weapon until it’s dead. Just make sure to use the curved staircase as cover (pictured above) as this provides great protection and a place to retreat if you take damage. Once the boss is dead, open the chest and claim your reward!