To this day, one of the most precarious and divisive content decisions Final Fantasy XIV made was The Forbidden Land: Eureka during the Stormblood expansion. Generally just known as Eureka for short, the pitch was simple: turn the relic weapon grind — a tradition of each expansion — into its own dedicated content. If you’re looking to level up fast in Eureka, we can only hope that our mammoth task of breaking down the process step-by-step will help.
Rather than the grind be yet another excuse for high-level players to run normal content with newcomers, Eureka was born to facilitate the journey from beginning to end, turning the traditional need to run old content into one all about new experiences. Still, that initially rubbed players the wrong way. The grind was just too tedious and, given progress could be lost upon death, potentially dangerous, unrewarding, and unfulfilling.
The people most capable of reaching the end simply didn’t need the rewards. But as time went on, and the idea of the Baldesion Arsenal was birthed to cap out the arduous adventure, player reception warmed up. Nowadays, it’s a little easier to get through. We know the tricks. But that doesn’t make it intuitive. For that, we’ve pieced together what we hope will be the guide to get you through it.
Eureka 101
What is Eureka?
In FFXIV, Eureka is the collective name of four special zones introduced sporadically throughout the Stormblood expansion. Designed as a way to spice up the game’s third relic weapon grind, it levels the playing field, literally, by using an independent leveling system like Palace of the Dead and Heaven-on-High. You’ll lose EXP if you have to return to base after a death, which can de-level you. Unlike those Deep Dungeon crawls, however, your overall progress is permanent.
Although you’ll need to be at least level 70, the level of your character outside of Eureka is ignored here. Instead, you begin your adventure at level one, beating up elementally-attuned monsters in the wild and during FATEs to earn EXP. It may sound like a bit of a grind (it is) but for some, it offers that old-school MMO experience that FFXIV moved away from. However, you do get some good lore as the story of Eureka centers around Krile, the Baldesions, and the once-lost Isle of Val.
How Do I Unlock Eureka?
Unlocking Eureka isn’t too difficult. All you need to do is grab the quest “And We Shall Call It Eureka” from Galiena in Rhalgr’s Reach after completing the Stormblood main scenario questline. In that quest, you’ll make a quick stop at Kugane to speak to Kotokaze, who’ll then ask you to walk down to Pier 1 at the far east pier of the city. The ship there will serve as the access point for what will eventually become all four zones of Eureka. That’s the easy part.
How Do I Join My Friends in Eureka?
As it’s an instanced zone that caps out at 144 players, simply queuing for Eureka will randomly toss you into any of the instances up at that time. This can make it hard to join friends who’re already in there when you decide to tag along. The easiest way to join friends is to party up and enter at the same time. If your friend refuses to leave their instance, all you can do in that case is join and leave Eureka until you land in the right one — which you’ll only know by opening up the Player List and scanning for your friend’s name.
Eureka instances actually lock themselves off to new players when there’s around an hour left on the clock, causing it to slowly bleed players as they leave for a more populated one. With that in mind, it’s wise to periodically check the player list to make sure you’re not alone. You wouldn’t want to take a risk when you know there’s nobody in the instance to help you back up.

How to Level Fast in Eureka
Leveling up in Eureka can be a chore. It’s much easier now than it was at launch, but you’re not going to breeze through this in a few hours like your average raid. Getting through this veritable hellscape that literally rewrites the rules of life on Hydaelyn is a game in and of itself. There are a few things you can keep in mind to level up fast in Eureka, though. Defeating mobs is one thing, but doing it efficiently can speed up the process massively.
Leveling fast in Eureka generally means keeping the level difference in mind. For solo players, taking on single monsters around 2-3 levels above yourself will generally yield the highest EXP possible without risking a costly death. The more players you add to your group, the higher-level monsters you can take on. Just make sure no player in the group is around five levels above the lowest player, though. You won’t gain EXP that way, so you’ll need to strike a balance.
Use the Resources!
I’m not talking about restoratives like potions or even the Logos Actions you’ll be dealing with later. I mean the actual player-made resources designed to make everyone’s lives in Eureka just a little bit less of a chore.
The unofficial FFXIV Eureka Tracker website will be your absolute best friend for however long you end up in your instance. Eureka was designed to mirror the hardcore grind of early MMOs. There’s very little information in the game itself. But fans have built detailed maps and FATE trackers to ensure you’re always aware of the risks of each zone and where you’ll find the best sources of EXP for your level. Keep it close.
Load it into a second tab on your desktop or have it on a phone or tablet beside you as you play. Everything referenced in this guide was written with my eyes glued to these maps. Without them, things won’t make much sense.
FATEs
Like the rest of FFXIV, completing FATEs can give a sizable amount of EXP. These can sometimes be extremely risky and time-consuming to run between, but they’re generally worth the effort. FATEs are triggered by killing the mobs associated with them. This can happen naturally, but more populated instances will likely have players trying to purposefully trigger these. As such, it’s generally a good idea to use a tool like the Eureka Tracker to keep tabs on which FATEs have recently been triggered.
Challenge Logs
Eureka has moments where progress will sometimes feel like you’re crawling through syrup. Some levels can feel slower than others. One quick fix to get you over this hurdle, and onto a new quest or Aetheryte unlock, is the Challenge Log. Completable each week, these long lists of challenges can award two or three full levels just for killing the enemies you’ll be getting experience points from anyway. Get through them for a quick dopamine boost, or save them for when things slow down.
Back when they were introduced, the Eureka Challenge Log tasks were a godsend. And while it can be tempting to get them out of the way as soon as you’re able, it can sometimes be smart to purposefully avoid completing them until you’re stuck in a particularly long and difficult level range where the enemies or their areas are just a bit to tricky or time-consuming to take down. That way you can breeze through leveling and sooner get back into the parts of Eureka that actually flow well. Keep in mind that Challenge Logs reset each week.
Mutations
Under certain conditions, many of the monsters in Eureka can “mutate” into larger, more powerful forms of their kin. This transformation typically happens once they hit half HP, and while they’re not that much more difficult to topple, a mutated monster will give dramatically more EXP than its non-mutated peers. You’ll have to look at the Eureka resource to know which monsters can mutate and their conditions for doing so, but it’s typically tied to the weather. Wail on them and they may just grow. Just take your trigger finger off your stun — if you interrupt the Mutation cast, the monster won’t try it again.
![]()
Sprites
Like Mutations, Sprites typically appear when the weather is right. Each zone has sprites for virtually every weather type, but their level ranges can vary so much that the weather in the zone might just not be right for your level. Once they line up, though, sprites can be the absolute best source of Eureka EXP. Since they’re also able to mutate (or “Adapt”), taking these on can level you up in record time.
Just be careful: Sprites are typically few and far between, and usually buried within other monster packs. Mind the monsters around you and play it smart. You wouldn’t want to have three Fire monsters aggro while your Magia Board is set to tackle a Thunder Sprite. And plenty of them aggro whenever a spell is cast nearby, so you might even end up fighting one whether you like it or not. It’s a high-risk, high-reward game.
Dragons
Dragons aren’t to be taken lightly. These sleeping beasts are typically placed along narrow roads and react to fast-moving feet. Often capable of one-shotting anyone but the best-equipped players in the instance, gleaning EXP from dragons means forming a large party.
Later on, it’s possible for one player with a full Magia Board and Eureka gear from the final area to Tank while two appropriately leveled players deal damage and support their hero. And while the EXP is generally enticing, the chances of chaining these beasts (more on that in a moment) is quite low. They’re few and far between, but if you can find a spot where you can reliably go between them, you’ll have found an impressive way to grind a level or two. And yes, these can mutate as well.
Chain EXP
Thankfully not culled alongside overworld chain EXP, your primary source of bonus experience points in Eureka will likely come from chaining mob kills. You’ll notice your EXP yield from a kill going up with each consecutive bonk, but every 10, 20, and 30 enemies you take down will give you a big EXP boost as well. You can use this to your advantage not simply by killing monsters over and over, but by timing these 10-kill boosts with any of the above bonuses. Strategize your killing so that your tenth lands on a Mutated monster, a dragon, or an Adapted sprite, and you’ll get a surge of EXP that’s just too hard to pass up.
How Does the Magia Board Work?
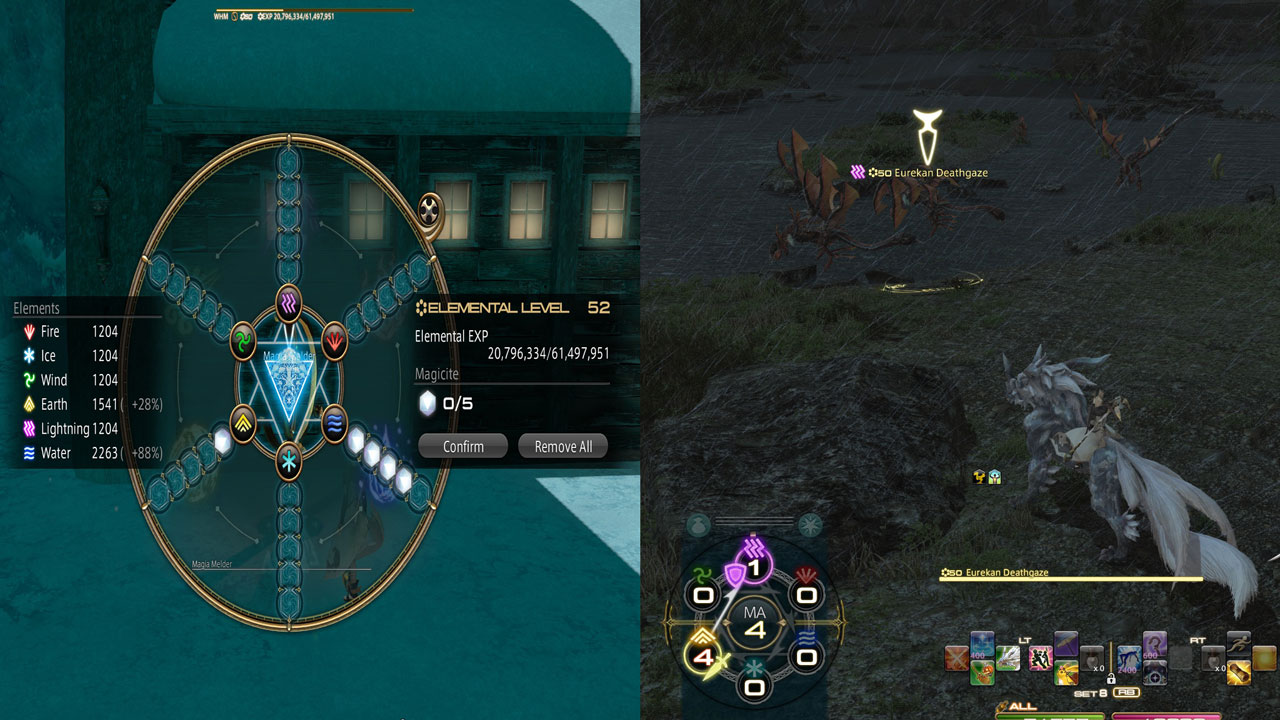
Beyond the need to level up separately from your typical level, the main gimmick of the entire Eureka saga is the Magia Board. It’s a six-sided board of elements, arranged like two sets of rock-paper-scissors matchups. Enemies in Eureka will be attuned to one of these elements. And you will also be swapping between elemental affinities to best set yourself up for encounters.
Throughout your time across the Eureka zones, you’ll amass points you can put into the Magia Board to protect you against the elements of the zone’s monsters and help you deal more damage by countering them with another. And rather than putting points into specific elements, you put them into the two clock-like arms, allowing you to change your point allocation on the fly as you turn the dial. What you’ll want to do is have one point on either side of the arm. Then, as you get more, stack them into one rather than the other (check the image above for an example).
Keep a few things in mind when spinning your Magia Board. You have a few seconds to continuously spin the board before it consumes a stack. Stacks recharge at a slow rate so be sure to land on the right elements you need. You can return to base to recharge your stacks rather than wait around for recharges, though.
Offense is largely more important, so looking at a 4-1 split by the end will allow you to deal much more damage to monsters while resisting just enough damage to not get mowed down. When you decide which monster you’ll target, spin your board so that you have more points in the element that counters it — your spread should then ensure you have at least one point in the defensive element. It makes a big difference. Level up efficiently and you won’t even need to worry about needing to run back to base to recharge your spins.
The secret to leveling up in Eureka is to find the right balance of mobs you can reasonably take on. Unless you’re in a party or a healer yourself, you’ll be relying on Eureka Potions to patch yourself up in combat. And with the risk of losing valuable EXP if you fall in battle and have to return back to base, finding that sweet spot will actually save you time in the grand scheme of things.
Anemos
- Level Range: 1–20
- Total EXP to Level Cap: 1,529,283
- Number of FATEs: 18

The first leg of your Eureka adventure will take you to Anemos. This elemental wasteland is vast and particularly confusing for a first trip, but don’t worry: things get easier to navigate over time. When you first get to Eureka, you’ll have to go through a couple of quests to get all set up: learning about how the Magia Board works, unlockable Aetherytes, the reason you can’t use your mounts (yet) — all that stuff. Just follow the quest icons around, then get out there and kill some mobs.
Levels 1–3
Starting at the very south of the map, complete the quests in the base until you’re free to leave. Slot in your Magia point anywhere you want. It doesn’t matter. So long as you put your second point one slot apart from your first, you’re set. Head outside to the East or West, pick a target, and spin your wheel until your point stops on either the element that’s strong against it (for tanks/healers) or defenses against it (for melee).
Grind against the mobs you’re most comfortable with until you hit level 3. Go back to the base to pick up the next quest from Krile. Complete it by interacting with the Confluence at the Early Natural History Society Observatory and talking to Krile again. Avoid heading there at night without a party. The mobs are scary.
Levels 3–5
Continue killing enemies within your means in the areas just east of the main camp. Seaboard Ogrebon, Vesper Bats, Glade Wivres, things like that, until you hit level five. The Lord of Anemos and Teles FATEs around here can speed things along if they pop up. Once you reach that level, talk to Krile again and interact with the Confluence below the cliff at The Orchard. Turn it in and continue the grind.
Levels 5–13
The next big step, unlocking Aetherytes, begins at level 9. This has been diluted with the abolishment of the mount limit in recent patches, but teleporting around is still safer than running through hordes of mobs. To reach this point, you’ll probably be relying on your weekly Challenge Log quests. Just head further north and stick to a particular mob. Running out of wheel spins will only slow you down.
Sprint to any viable FATE you can manage, but be sure to team up with other players. Healers and Red Mages can earn contribution on FATEs they’re under-leveled for by helping the team out, and it’s just generally safer to have people who can help you up if something takes you down. At night, track down Ashkins like Duskfall Skeletons you can reasonably kill just to get the extra EXP from the Challenge Log.
At level 9, go and attune to the Aetherytes at Abandoned Laboratory and Windtorn Cabin. Farm EXP from the enemies around these points, freely spinning your wheel if needed. It’s easy enough to teleport back and forth, so it won’t matter if you exhaust your board spins. As usual, keep an eye out for FATEs. They’re still generally worth it over a monotonous mob grind, and it should make it so you have all the necessary materials to rapidly complete the final quest. Once you hit level 13, head back to Krile and interact with the Confluence by the Val River Swale waterfall. Then it’s back to the grind.
Levels 13–17
At this point, you’ll really want to find a group to team up with. The grind will only get slower, and while EXP is split between party members, you can generally save time by simply killing more enemies more quickly. At level 13, the mobs around the north Aetheryte will be fine for solo play, but groups should be able to take on the ones due east. Two FATEs can pop here, boosting gains even further. At level 17 keep grinding until you have 99 Anemos Crystals.
Go talk to Krile one last time and head to the Uncanny Valley as per her request. Trade the crystals to the Aethernet Relay she sends you to after that and you’ll be able to put Anemos behind you, if you want. If you don’t want to rely on a group from the start of the next zone, keep grinding until you hit level 20.
Continue the grind up to level 17 and you’ll take on Krile’s last Eureka Anemos quest. This one ultimately requires you to turn in 99 Anemos Crystals. Hopefully, by now you’ll have more than enough of them. With that, you’re free to move onto Pagos or stick around to work on the first relic step or level up further in relative safety. Even at level 20, most players would go back into Anemos to complete their weekly Challenge Log missions. The enemies in here just made it easier. Either way, once you’re ready to move on, just leave the instance and talk to Rodney the Ferryskipper and choose Pagos from the menu.
Pagos
- Level range: 20–35
- Total EXP to 35: 27,941,593
- Number of FATEs: 19

If you enter this place, congratulations (or commiserations): you have the Eureka itch. Pagos is more open than Anemos, but its inclines and cliffs make it a really risky place to sprint around without risking a sudden death.
This Eureka zone introduces Bunny FATEs. There are only a couple, but you’ll see them spawn frequently. They’re not good sources of EXP, but they can offer some decent rewards in a unique way — including 100,000 Gil in some cases. Get a good score in the FATE and you might get a bunny following you around afterward. Use the new action it provides and follow the clues to find a buried treasure. The fancier the find, the better the loot. The little keyhole icons on the map are all the potential treasure locations.
Levels 17–21
In Pagos, you’ll start at the far west of the map. As soon as you leave, you’ll be face-to-face with level 20 enemies. Level 17 players can take these on with the right strategy, but waiting to clear some weekly Challenge Log quests back in Anemos or finding a group to grind with is the better solution time-wise. Whatever your approach, get yourself to level 21 and make your way back to Krile for the zone’s first quest. Watch out for the cliffs, and attune to the Aetheryte further east of the quest location while you’re at it. Use it to get back to base, finish the quest, then teleport back out there.
Levels 21–23
This next tiny step shouldn’t be too big a deal. Teleporting to the Aetheryte will put you right in the middle of optimal enemies and plenty of FATEs. You should have no trouble finding a group to tag along with in this area. So long as you’re all within 4-5 levels of each other, you’ll gain decent EXP chaining the enemies and triggered the FATEs. Once you reach level 23, teleport back to Krile and complete her next request: which is finding the Depleted Aetherial Stream in The Val River Belly area.
Levels 23–25
This step practically mirrors the previous one. The level 23 quest location has a bunch of enemies three-four levels above lingering in the vicinity. If you’re still with a group, get grinding mobs and completing those FATEs. Get that last level in and go see Krile to start another quest involving a Magecite at The Eastern Edge. This one won’t get you near the Gravitational Studies Aetherye despite unlocking at this level, but don’t worry about it just yet.
Levels 25–29
The next step, again, mirrors the last two. Enemies around the objective of the freshly completed quest are all great for small teams to take on. Getting between the two cliffs making up the valley will waste time, so pick a mob pack and stick to them, rotating whenever you defeat enough to spawn a FATE — if that’s the route you’re taking. It’ll be a bit of a slog to the next quest, but once you hit level 29, head back to Krile for your penultimate quest in this barren wasteland.
This one requires you to see Ejika, who you’ll find on a curious ledge not far from the base. You’ll have to go up and around the northern area to reach it. When you approach the ledge, look below to ensure you’re landing on the west-most section. The other will (after a dragon) lead you to the Forge needed for upgrade your Relic Weapon. That’s not the goal just yet.
Levels 29–35
The lofty area you ran through to approach Ejika’s cliff is a great place to grind out the last few levels. You’ll want to avoid approaching the Mindertuar FATE to the east, though. You’ll need to drop down to reach it, and the walk back is quite long. Instead, just stick to the usual plan, killing off monsters in a group to trigger nearby FATEs. If you’re solo leveling, start further east with the Val Guardians and the King Igloo FATE. If your group starts to get bold as they near the final few levels, the area far to the east (where the level 25 Aetheryte is cruelly placed) should speed things up. You’ll need to go to the northern peak of this area for the level 35 quest anyway.
With all that done, it’s time to move onto Pyros — the last proper jungle of the Eureka campaign. Before that, though, it’s time to talk about Logos Actions.
Logograms, Logos Actions, And You

From Pyros onward, you’ll gain access to Logograms. These are unique, additional skills you can equip and use in the final two zones of Eureka. They’re unlocked by examining and combining different types of Logograms dropped from monsters and FATEs. These essentially give you skills your Job otherwise wouldn’t be able to use. For example, healing actions for a DPS, buffs for a Tank, or barriers and reflecting skills for whoever.
You won’t need to rely on them to get through the challenges ahead, but they can make things a lot easier. They function as consumables, though, so unlocking one doesn’t mean it’ll be there forever. If you want to keep raising random players and teammates as a non-Healer, you’ll need to keep a healthy supply of the materials needed to craft the Logos Action.
Pyros
- Level Range: 35–50
- Total EXP to reach cap (from 1) : 282,678,691
- Number of FATEs: 19

Despite its name, Pyros is, for the most part, an arctic wasteland. A tundra. A veritable fjord. You’ll have to really start carving out routes with this one. Inclines and thin, winding roads complicate things, making the map look more easily traversable than it really is. There’s a lot of risk involved in leveling up here, but it’s considered the final frontier. Hydatos, the next zone, is a flat field by comparison.
Levels 35–37/39
Once you’ve covered all the jobs in the camp, it’s time to head back into the wilderness. Solo players will want to focus their efforts of the enemies closest to the camp. Don’t get too ahead of yourself. Groups, however, might want to head a bit deeper in. After a few levels with my group, I personally went and soloed the ice cavern south of the camp.
As a White Mage, I could stun, heal, and AoE my way through the large Pyros Bhoot clusters to gain some pretty swift EXP. So that’s a suggestion for anyone confident in their multi-mob management. At level 37, you can opt to head to the far south of the map to unlock the Aetheryte, or continue where you are until you hit level 38; by which point you’ll be able to accept another quest from Krile and Drake.
After visiting The Surgate Town House and grabbing the Promising Scrap from behind it, she’ll ask you to see to the Confluence at The Firing Chamber. If you’ve hit level 39 at this point, you’ll be able to attune to the Aetheryte nearby.
Levels 37/39–40/41
This slim section depends entirely on whether you decided to really grind it out before picking up the last quest. If you’ve attuned to the Firing Chamber Aetheryte already, you only need one more level to take on Krile’s next quest. In a group, head to the Surgate Town House again and farm these mobs until you level up once more. If you’re still trudging through levels 37 and 38 alone, stick to the far east side of lower map to find mobs at a more appropriate level. You’ll be within range of three decent FATEs here, which should speed things up for you. At level 40, Krile will send you to pick up another Confluence at West Flamerock. If you’re level 41 at this point, continue on from here to find another Aetheryte tucked away along the east wall at Carbonatite Quarry.
Levels 40/41–45
This next leg can feel a little long. Five or so levels before another quest is quite the change, and things are only dragged out further by the rapidly increased EXP requirements. At the bottom end of this section, you may just want to hang around the Carbonatite Quarry Aetheryte and wait for the various FATEs in this region to pop — assuming there people nearby defeating the required mobs. If you’d still rather farm for yourself, stick to the lower levels of the bottom portion of the map as a solo player or the Surgate Town House again. That’s until you feel ready to take on the enemies (level 45 to 47) in the first two areas of the map’s northern section, and you’ll want to move clockwise around you level up. At level 45, grab the quest from Krile and meet her at The Living Foundry.
Levels 45–50
Capping off the final part of Pyros means hitting level 50. Groups should be able to manage this by working their way around the eastern nooks of the upper region. When soloing, you’ll basically be one step behind groups, so you’ll want to start on the west side and work clockwise as you level up.
At this point, you may even want to try the crystal farming method. This requires unlocking the Reflect Logos Action, stripping down to your smallclothes, and letting a high-level sprite (typically seven levels above) cast its magic at your shield until it dies. It’s incredibly risky. You have to refresh the spell after every two or three casts, and letting one cast slip through will cost you time (or EXP), but the rewards are bountiful if you’re able to pull it off consistently.
Once you hit level 50, it’s time to complete the hardest quest of the zone. Krile will ask you to go up to the far right corner of the map, which is the entrance to the lair of the zone’s big FATE, and then back to the bottom-left corner, which is a long corridor filled with monsters five levels above the cap. Be careful. You wouldn’t want to lose EXP and de-level now.
Hydatos
- Level range 50–60
- Number of FATEs: 14
- Total EXP to 60: 1,183,885,646

Hydatos. The final frontier. A breath of fresh air in that it’s an entirely flat plane with no winding roads and dangerous corridors. You’ll still want to be careful here. Don’t get ahead of yourself if you’ve had a relatively easy time up until now. The existence of paid-for Magia points means things are tuned a little more strictly here. Your best bet early on is to chase down FATEs for some easy EXP. Get a couple of levels in before you go back to the old ways of grinding specific packs. Just to be safe.
Levels 50–51
The flat terrain mixed with the FATEs in Hydatos can often trick you into wandering into areas you’re too weak to handle. It’s tempting to run off to the level 53 FATE in the top-left early on, for example. But just because it’s a stone’s throw away from the easy mobs you’re farming outside the camp gate, that doesn’t mean the enemies in the vicinity are as well. For all intents and purposes, the mob levels in Hydatos are split into three distinct zones: the middle, left, and right portions of the map — the order you’ll want to go in, at least for leveling alone.
So for this first level, either kill the mobs right outside the camp, or deeper south along the aforementioned path so find slightly tougher fish to fry. If the weather is on your side, Death Sprites can be a good option for groups or solo players still into Reflect spamming, but they’ll want to move to the left after the first level or two.
At level 51, grab the quest from Krile and meet her at the bottom of the map. Make a mad dash to the west if you want to attune to the Unverified Research Aetheryte for future use.
Levels 51–54
For this chunk of levels, light parties will want to challenge the enemies just on the edge of the left and center areas and work their way upward. Solo players can take on the sprites around here as well if the snow or rain comes down. Consider checking in with the forecast and coming back when the time is right. If not, take on something like the Nestless Cockerel to the east or the Hydatos Vepar above them. At level 54, Krile will want you to visit the Western Columns and investigate the Pooled Aether
Levels 54–57
This is prime time for the solo players in the west section of the map. Start at the bottom and work your way up, sprinting to the nearby FATEs whenever they spawn. For the groups already at the tip of this area, keep at it until the level 60 enemies just east of the camp don’t sound so scary anymore. You’ll be able to attune to the Dormitory Aetheryte at level 55. Then at level 57, see Krile at the Western Columns again. Head to the Eastern Columns from there, then North to find a Pooled Aether at the Val River Bank before running back to her.
Levels 57–60
At level 57, solo players will, again, be a step behind the groups. Starting at the peak of the western section and taking on the FATEs is still recommended before moving onto the level 60 enemies by the camp. For the groups, simply start at the bottom of the east section of the map and work your way north as you level up — the enemies will practically level up alongside you, and you’ll be killing enough of them to trigger the many FATEs they’re linked to.
Alternatively, players grouped up or solo can opt for the faster — but far more risky — Sprite farm method again. There’s a small island at the bottom of the eastern area that houses nothing but level 65 sprites based on the current weather conditions. Strip off, spam the Reflect Logos Action, and run in. Cast a spell for good measure. They like that. Then just stay on top of refreshing your Reflect and the Sprites should kill themselves, supercharging your EXP bar. This method is so fast that even when Eureka was more of a chore, players who were KO’d in the Baldesion Arsenal raid were even able to grind back to max level and rejoin.
And there you have it. There’s plenty left to do after hitting max level in Eureka — like completing your Logos Actions library, opening lockboxes, completing the devious Baldesion Arsenal raid, story quests, and even completing your Relic weapon. But you’ve done the grind now. It’s time to either leave it all behind or wrap up the loose ends without pondering where you’re going to get your next chunk of EXP from.