Final Fantasy XIV Patch 6.2 starts off with a bang by hitting you with some wild story developments then shipping you off to the new dungeon shortly after. Upon entering the Void, you’ll be in The Fell Court of Troia. While it follows the familiar FFXIV dungeon formula, the boss fights have some tricky mechanics up their sleeves.
If you have fond memories of Final Fantasy IV, you’re in for a huge treat with music and references to the old RPG, which served as inspiration for much of Endwalker. Otherwise, it’s a fairly straightforward duty. Here, we’ll prepare you for The Fell Court of Troia with this dungeon guide.
This guide is from the perspective of a DPS player using the Duty Support / Trust system with NPC party members. It also assumes tanks are doing wall-to-wall pulls.
Be warned that dungeon guides contain spoilers. If you prefer to preserve the surprise for yourself, give it a run before referring to a guide, then come back here if you need help.
First Mob Pull
The first trash mob you’ll pull consists of Troian Sentries and Troian Scavengers. Pull all of them and burn them down with AoE attacks. Watch out for the Sentry’s Evil Phlegm and Scavenger’s Dark Amiyisme casts; both are large circle AoEs.
The second pull consists of Troian Pawns, and more Troian Sentries and Scavengers. Burn them all down with AoE attacks of your own. Watch out for the Pawn’s Condemnation cast, which is a cone AoE.
First Boss: Evil Dreamers
The first boss in The Fell Court of Troia is a slight change of pace. Instead of focusing on one target, you’ll be firing off your best AoE rotation to take down a ton of Evil Dreamers. It’s a fairly simple fight, though. You mostly have to anticipate signs of danger and dodge AoEs.
- Pull and burn down the first pack of Evil Dreamers. Five more Evil Dreamers will spawn into battle while seven others spawn on the outer edge of the arena. The ones on the edge will charge up and fire line AoEs in the direction they’re facing. The result is a large crossing pattern with cone-shaped safe zones in the north and south of the arena. The rest join the right; burn them all down.
- Another round of Evil Dreamers spawn into the fight. All party members will be marked with a tracking AoEs while six more Evil Dreamers charge up to fire line AoEs in another crossing pattern. This time it’s in the form of a wheel spoke. Spread out from allies to avoid overlapping damage from the AoEs and position yourselves in between the line AoEs to avoid getting hit.
- Seven more Evil Dreamers spawn in evenly spaced out and mark large AoE circles covering the entire arena. Choose one Evil Dreamer to focus-target and take down before the Unite Mare cast finishes to create a safe zone for the party. At the same time, more Evil Dreamers spawn to fire line AoEs again down the center of the arena — make sure to focus-target an Evil Dreamer that is away from where the line AoEs will fire.
- The last phase is a DPS check. A massive Evil Dreamer spawns in the center and begins casting Endless Nightmare. Focus-target and burn them down before the cast goes off. While this is happening three untargetable Evil Dreamers spawn in to leave large circle AoEs – pay attention to which of these smaller Evil Dreamers gets additional ones tethered to them. The ones that receive tethers will grow bigger and leave larger AoEs that cover their entire side of the arena. Move away from these ones while laying on damage to the main target.
Second Mob Pull
As you make your way through the castle, you’ll face Troian Guard and the Troian Footman. Guards can cast Void Trap, a circle AoE, and the Footman may cast Grim Halo, another circle AoE. Troian Hounds and Troian Riders lurk beyond. The Riders cast Geirrothr, which is a cone AoE.
More Troian Hounds are found further in, then Troian Knights and the Troian Bishop make their debut. Knights cast Hall of Sorrow, which is a large circle AoE, and the Bishop can cast Jester’s Reap, an extra wide cone AoE.
Second Boss: Beatrice
Beatrice can be tricky to read as she uses some non-traditional visual cues as attack indicators. Once you understand what they mean, the fight can be straightforward. Just be mindful of the direction you’re facing when you see the evil, dark, glowing eyes as visual indicators for attacks.
- Eye of Troia: Beatrice moves to the center of the arena and summons a circle with the dark eyes indicator attached to them. The circle will converge onto her position. When it does it’ll hit the entire party, but you’ll need to look away from the boss to avoid getting a Vulnerability Up debuff.
- Beatific Scorn: She will mark the arena with laser beams in a specific order; this dictates the sequence of AoEs that soon follow. There will be two curved lines on the arena’s side and two down the middle. Large circle AoEs will burst from these points. Position yourself on the last marker, then quickly move to a safe zone left behind by the first or second markers.
- Hush: A standard tankbuster. Tanks use mitigation skills.
- Voidshaker: Beatrice casts a wide cone AoE towards the tank and marks all players with a tracking AoE. Move away from the cleave and spread out to avoid overlapping damage.
- Eye of Troia (Version 2): This second version first hits with a party-wide attack then summons two sets of two converging rings (with those dark eyes indicators), one after the other. These rings activate at two opposing cardinal directions for each set. Face away from where the first set activates, then turn direction to face away from the second set. While this is happening, Beatrice also casts Toric Void.
- Toric Void: This cast sets off two donut AoEs hitting the outer perimeter of the arena. Stay within the boss’ melee range to avoid getting hit. All party members will be marked with tracking AoEs as well, so spread out to avoid overlapping damage.
- Beatific Scorn (Version 2): This is the same as the first version, except the party will also have to deal with a stacking marker. Party members group up to share the damage while avoiding the AoEs marked by Beatrice’s lasers.
Third Mob Pull
The next mob pull features the Troian Trapper, Troian Butler, and Troian Equerry. Watch out for the Trapper’s Arachne Web circle AoE, the Butler’s Dark spell which is a cone AoE, and the Equerry’s Swoop circle AoE.
Finally, the last trash mob has the previous enemies but now with Troian Stewards. These big dudes can cast Karma, which is a massive cone AoE cleave that might gives party’s trouble. They may also cast Unholy Darkness, which is a basic circle AoE.
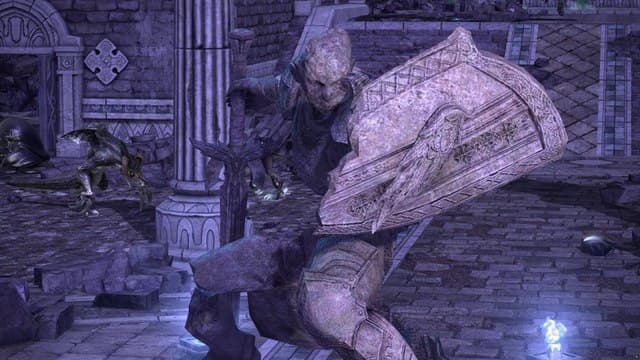
Final Boss: Scarmiglione
If you have any love for Final Fantasy IV, you’re in for a treat with this boss and battle theme (which is arguably still one of the best battle themes in franchise history). Scarmiglione likes overwhelm you with AoEs, but you’ll be fine as long as you’re mindful of positioning. This fight takes place in a circular arena with a poisonous border and a few walls propped up — this will be key for some of the mechanics.
- Cursed Echo: This is a party-wide attack to heal through. It also inflicts a temporary bleed.
- Rotten Rampage: This cast sends out three sets AoE circles starting from the center then moving outward. Each player is marked with a tracking AoE as well — this will hit players while the ground AoE sequence is in progress. Spread out to avoid overlapping damage but also find your own safe zone among the AoEs.
- Be mindful of being close to the walls of the outer edge. Letting your tracked AoE hit a wall eliminates it, giving you fewer walls to work with in the next mechanic.
- Blighted Bedevilment: The center become dangerous and applies a debuff if walked into. When this cast finishes players will be knocked back. Align yourselves so you’re knocked back into one of the remaining walls and not pushed into the poisonous outer edge.
- Blighted Bladework: Scarmiglione floats, faces a certain direction, and marks a spot somewhere on the outer edge of the arena just before the cast goes off. When the cast finishes, he’ll slam into the spot for an extra large AoE. Run to the opposite end to avoid getting hit.
- Blighted Sweep: The boss will remain at the outer position, face the rest of the arena and begin this cast. This is a huge cleave hitting most of the arena. Move right up to the sides of the boss as soon as the previous attack is done to avoid the massive cleave.
- Firedamp: A standard tankbuster. Tanks, y’all know the drill.
- Creeping Decay: This cast marks the beginning of a DPS check phase. The boss will become untargetable and begin gathering strength indicated by the “Scarmiglione’s Power” meter. Let’s go through this phase one step at a time.
- A gang of Necroserf adds spawn into the arena that you’ll have to AoE down before the boss’ meter reaches 100.
- As you’re dealing with the adds, the outer edges of the arena get marked with large circle AoEs.
- Next, all players will be marked with tracking AoEs, forcing everyone to spread out and avoid overlapping damage.
- Then, large circle AoEs will mark the center of the arena, which you’ll have to avoid.
- Lastly, you’ll have a standard stacking marker to bring everyone together and share damage.
All the attacks prior to Creeping Decay will repeat until the boss is down. So keep dodging AoEs and avoiding getting knocked into poison.
That’s all there is to The Fell Court of Troia. There is also a new eight-player Trial boss fight in FFXIV Patch 6.2 MSQ, which we have a guide for. We suggest getting further in the 6.2 questline before checking out the guide in case you’re worried about spoilers. For everything about this latest update, be sure to read our full breakdown of FFXIV Patch 6.2. And make sure you check out all the new content like Island Sanctuary and the new Abyssos raids.