In FFXIV, Dirty Rotten Azulmagia can largely be considered the true start of any player’s Blue Mage career. If you don’t know what I’m talking about, this is stage #25 of The Masked Carnivale: a sort of solo micro-dungeon for Blue Mages that becomes avaiable after the job reaches Level 50. You can find the entrance right next to the Miners’ Guild Aethernet Shard in Ul’dah after progressing far enough through the job’s story quests. Defeating the boss will then let you continue further with the plotline! Just be prepared; Dirty Rotten Azulmagia lives up to his name and then some.
One quick note to add here is that the Azulmagia fight is split into multiple acts. However, all acts must be undertaken in order. Losing to the boss during phase three, for example, will force you to restart all the way back at phase one. There is no checkpoint system.
There’s also a time limit of 30 minutes which is shared across all three acts. Don’t let that worry you too much, though. That’s more than enough time to beat down the wily wizard three times over. It’s much, much more important to tackle the fight slowly and steadily, in fact. Missing a little bit of damage here and there to dodge an area-of-effect attack won’t kill you. Slipping up just once or twice during the battle will definitely drop you out of the fight and force you to restart, though.
In short: don’t get greedy.

Last but not least, I strongly recommend having at least all of the following skills equipped from your Blue Mage spellbook before starting this fight:
- Glower (or an equivalent, spammable magic damage spell)
- Drill Cannons
- Loom
Each of the three acts in Dirty Rotten Azulmagia require specific tactics to progress. We’ll get into them all in the next few subsections, but the “must-have” abilities basically boil down to these three. Don’t start without them or something similar ready on your hotbar.
Dirty Rotten Azulmagia – Act 1
Speaking of the start: here it is! Though Act 1 of Dirty Rotten Azulmagia isn’t actually very difficult. That’s if you know what you’re doing, anyway, and most importantly what you shouldn’t be doing.
At the very beginning of this fight — and throughout the rest of Act 1 — Azulmagia will cloak himself in a barrier that reflects physical damage. This includes Blue Mage spells like Drill Cannons, but also your own auto-attacks. This means you should never have auto-attack turned on during this phase of the fight. In fact, I recommend just leaving it off entirely, since it doesn’t add that much damage from a caster like the Blue Mage anyway. Yet it will kill you very, very quickly.
Besides that one major factor, Act 1 is just a game of dodging pretty run of the mill AoE attacks. Apocalyptic Bolt fires in a straight, telegraphed line that you can easily dodge by standing close to the boss and running through him when he casts it. The same goes for Apocalyptic Roar, which is a front-facing cone AoE. Both attacks are impossible to miss thanks to the usual orange outlines.

The only seriously deadly move during Act 1 is The Ram’s Voice. This is a “point blank” AoE with no orange marker. You simply need to watch for the skill name to appear above Azulmagia’s health bar when he starts to cast it. When that happens, move a decent distance away from the boss and wait for a small explosion of ice to erupt around him. Once that’s done, get in close again to dodge The Dragon’s Voice. This is a “donut” AoE that affects the entire arena except in the space immediately around the boss.
Azulmagia will always use The Dragon’s Voice immediately after The Ram’s Voice, so it’s just a game of moving away from — and then back towards — the boss again and again. Getting hit by either spell can be quite devastating: The Ram’s Voice freezes the player for several seconds while The Dragon’s Voice causes you to become paralyzed (periodically cancelling spells and movement). Getting hit by both, one after the other, is pretty much a death sentence.
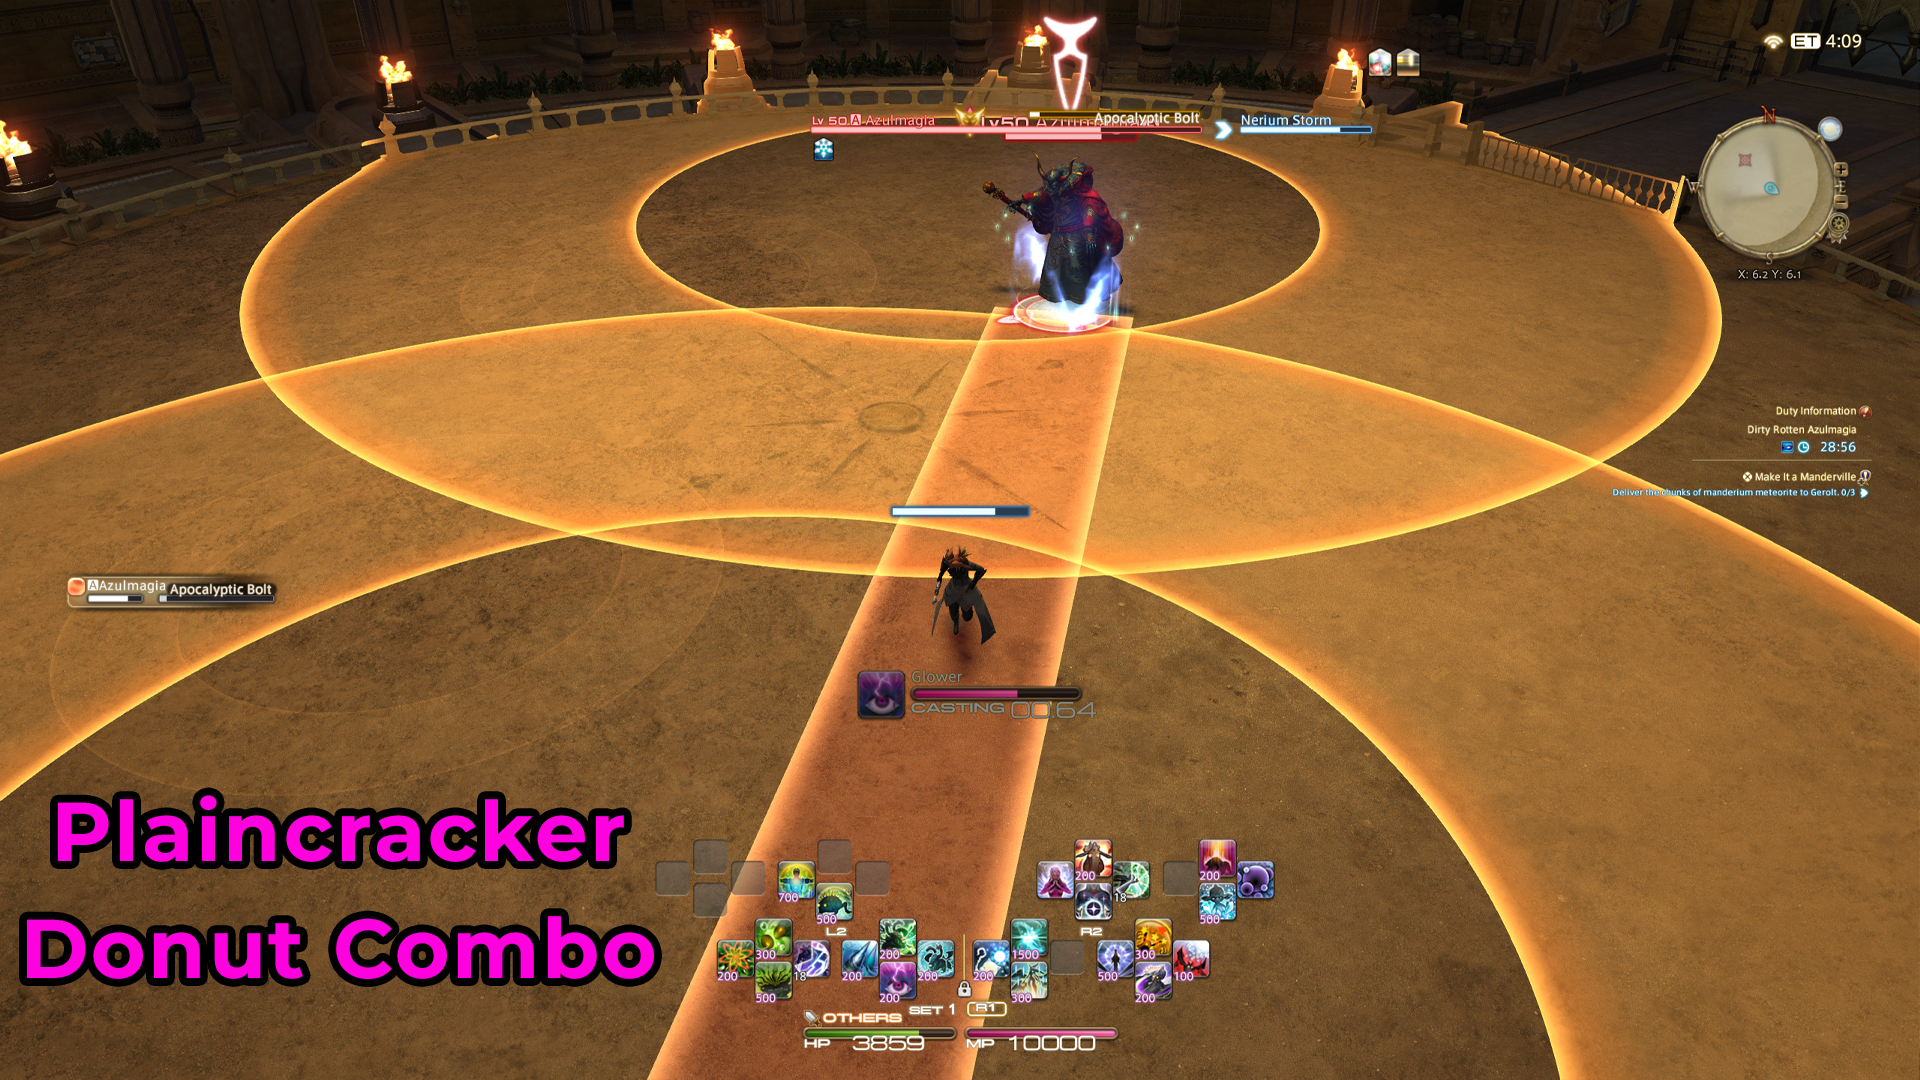
The final spell to watch for is called Plaincracker. This is another point blank AoE, just like The Ram’s Voice, but this time it has telegraph marker. You just need to move away from the boss to dodge it. However, Plaincracker is always followed by two sets of large, overlapping donut AoEs and either Apocalyptic Bolt or Apocalyptic Roar. This means there will only be a couple of tiny safe spots to stand on the ground during this attack — usually behind Azulmagia, since the bolt and the roar both target his front.
If you get hit by any of these attacks, you will take a stacking Vulnerability Up debuff. Just like in most dungeons, raids, and trials. However, it’s a lot less devastating than the Ram’s/Dragon’s Voice combo, so you can eat one or two hits without too much concern.
You should shoot the boss with your magical damage spell of choice for the entire duration of the fight. Anything that doesn’t do physical damage works, but every Blue Mage player should already have Glower available from the preceding story quests. Just spam that spell (or another that you prefer) while dodging the attacks. That’s it for Act 1!
Dirty Rotten Azulmagia – Act 2
The second act isn’t much different from the first. This time, however, Azulmagia will reflect magical damage. This even includes non-damaging spells like Off-Guard. It’ll still damage you if you cast it! This means you need to spam the boss with something like Drill Cannons (a spell that deals physical damage) to proceed. It’s also safe to use auto-attacks again. Y’know, if that’s something you care about.
You can acquire Drill Cannons from several enemies in FFXIV. Though the Magitek Vanguard H-2 enemies in Northern Thanalan are probably the easiest. These are found just outside the entrance to Castrum Meridianum in the northern part of the region (around the coordinates X: 17.0, Y: 15.5). Simply pick a fight with the enemy, wait for it to use Drill Cannons, then kill it. The acquisition process is somewhat random, so you may need to kill several Vanguards before you get the notification that you acquired the spell (just like most Blue Mage abilities).

With the spell equipped, spam away on Azulmagia while dodging more of his AoE attacks. His new move this time is Blazing Angon. This summons 2-4 spear-like adds that the boss stabs into the ground. After which they will begin to apply stacks of burning damage to the player until they are destroyed. Thankfully, they die to just a hit or two from Drill Cannons, so you can remove them almost as quickly as Azulmagia can cast them. You can even position each Blazing Angon between you and the boss as you cast: allowing you to shoot each spear with Drill Cannons and still hit Azulmagia with the AoE.
Whichever method works best for you is fine. Just make sure the Blazing Angons die before you take too many stacks of the “Burns” debuff! The hardest act is still yet to come. We don’t want to fall down here!
Dirty Rotten Azulmagia – Act 3
This is where the fight finally gets hard. Very, very hard. So let’s get into it…
Throughout this third and final act, Azulmagia will sometimes switch between both Repelling Spray and Ice Spikes. The first reflects magic damage back at the player while the second reflects physical damage — just like in the previous two fights. You’ll just have to watch for him to cast each spell (or keep an eye on your health bar to see if it starts randomly dipping) to tell which type of barrier he’s erected at any given time. That being said, the boss always starts this phase by using Repelling Spray first (just like in Act 2). Meaning you should start by casting Drill Cannons or something similar.
The arena is also much smaller this time. Which you’ll probably be able to tell from the large donut of electricity surrounding the floor. It probably goes without saying, but don’t stand in that!

You should also avoid Charybdis: the boss’s first new move for this phase of the fight. This summons four circular tornado AoEs equidistant from one another throughout the arena, further limiting where it’s safe to stand and how much you can see. Stepping inside any of the tornadoes at any time will suck you in and almost certainly kill you, so you should obviously avoid them.
The last (and almost certainly deadliest) new combo is Web followed directly by Meteor. When you see Azulmagia cast the first spell, run as far to one side of the arena as the tornadoes and electric donut will let you. Web will inflict you with a supercharged form of Heavy: slowing you down significantly. The boss will immediately follow up by casting Meteor at your location, which is a massive one-hit-kill AoE that leaves behind a burning puddle of fire for a few seconds after it lands.
To escape the combo, you need to cast some type of teleport spell. Loom, which can be acquired from Tam-Tara Deepcroft (Hard), and Flying Frenzy, which can be acquired from Pharos Sirius, both work just fine. Though I personally prefer Loom since it allows you to select a specific location to warp to — not just any enemy. Note that you might need to cast the spell twice in short order to fully escape the AoE! Sprinting can also help, since it actually counteracts the effects of Web a good bit.

Right after Meteor lands is usually when the boss decides to swap his barrier skills, for the record, so be ready to switch from physical to magical attacks at this stage.
Azulmagia will repeat and overlap his usual tricks from this point forward — just with less room for you to maneuver thanks to the tornadoes, the electric circle, and the huge puddle of fire left behind by Meteor. Just like with Blazing Angon and Plaincracker, however, you can take a few hits from most of his abilities! The only truly lethal attacks are Meteor and the Charybdis tornadoes. So, if it comes down to it, let yourself get hit by a normal AoE instead of walking into either of those.
I also highly recommend that you zoom the camera out as far as possible for the entirety of the fight. This makes it easier to tell where you’re standing amidst all the whirling deathtraps and airborne nukes. This is especially important if you use Loom to teleport out of Meteor, since you need to see where you’re standing to avoid instant death.
And that’s everything but the cutscenes for the Dirty Rotten Azulmagia fight! Frankly: it’s going to take you a few attempts. The first two phases are nothing special, if you know what the boss is weak to, but Act 3 is a real doozy. There’s simply so much to remember and watch out for. With some practice and perseverance, though, you should get through this Blue Mage boss fight in good time.