Arknights has some frankly terrifying stages to try and puzzle out, especially on some of the challenge modes. The latest episode, Necessary Solutions, doesn’t let up off the gas, either! While all of the stages involve multiple exit points to defend, many of the later stages require you to utilize “Jammer” technology to slow or stop drones. Saddle up and bring your best units, we’re going to take a look at the worst Jammer map in Episode 5 – Chapter 7, In Life and Death!
More Arknights:
- Arknights Tier List Guide – Best Characters and Operators (March 2020)
- Arknights Recruitment Guide – Recruiting Better Units with Job Tags
- Arknights Rerolling Guide – How to Reroll For The Best Units
Getting Started
First things first, despite the game recommending Elite 2, Level 10 – all units that you utilize really should be at least Elite 1, Level 40 or higher. You might be able to cheese out one or two units being below this, but anything not Elite 1 at a minimum will be a detriment.
Second, the line-up:

I tried to use as few rare units as possible. In reality, any of the six-stars that I have can be replaced with their five, four, or three-star variants! Understand though, the lower the star level, the more necessary it is that they be at max level.
You require three Vanguards, two Snipers, a single-target Caster, an area-of-effect Caster, two Defenders, two Medics, and a ranged attack Guard. Of the units above, the only core unit that I think cannot be replaced is Cuora, and that’s due to her unique second skill, which lets her tank four units at once. If you do not have Cuora, you can obtain her from the Store for 150 Purchase Certificates (the red currency).
Siege can be subbed out for any Vanguard that generates Deployment Points (three-star: Fang), Hoshiguma can be replaced by any other Defender (three-star: Beagle), and Shining can be replaced by any other Medic (three-star: Hibiscus). Steward can be changed out for Amiya, if you have her leveled up. Silence can be substituted by another Medic (three-star: Ansel).
Finally, this strategy isn’t the only one that works: if you have six-star or five-star units that fit into slightly different roles, you can still make it work. The key is knowing the spawns and adjusting accordingly.

Setup / Early Game
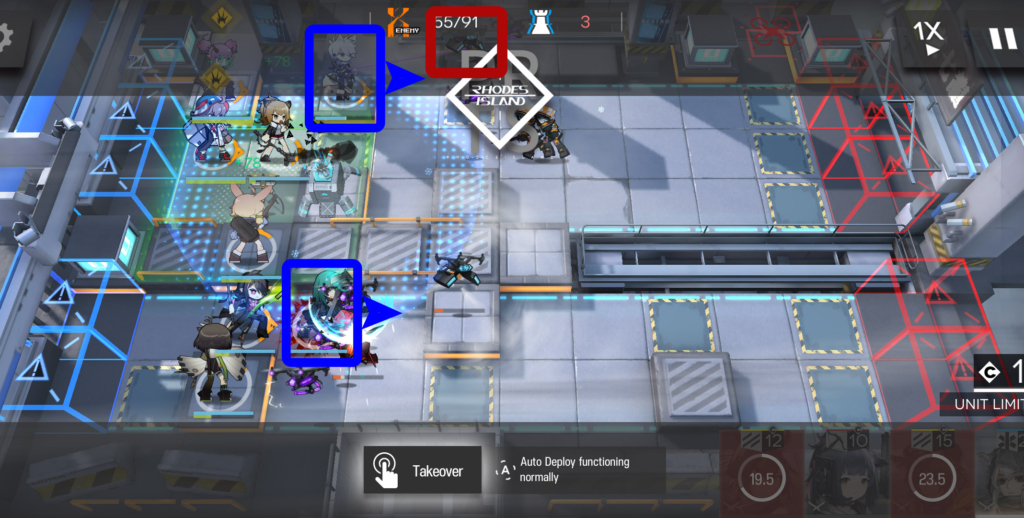
You’ll notice that there are four exits, but realistically only two lanes of travel. This is because the level alternates between melee units and aerial units, which means a balance of ranged and melee Operators is necessary. Also, take note of the 40 cost Jammer on your lower screen. That’s the key to winning this map.
In the above graphic, note the red squares: these are Frost Drones, and they slow any Operator’s attack speed and energy generation that you place in their AOE. One might be tempted to take them out immediately, but they are very tanky, so we’ll have to be smart about this. We have a whopping 91 enemies to burn through, so let’s get started.
To prepare for the first wave, start off with a cheap, DP-Generating Vanguard, such as Courier, in the blue square, facing north.

In the middle of the first wave, place a second, cheap Vanguard in the blue square above, facing south. This allows these two Vanguards to take parting shots at the middle group as they pass, if they have no other targets to fight. These two Vanguards will need to be retreated at some point in the mid-game.
The initial wave will be several Originium Slug βs in the top three lanes.

To deal with the middle Slugs escaping, place your third Vanguard in the middle, near the exit, facing east. This Vanguard will stay here the entirety of the level, and so positioning them near the exit allows them to receive support from the surrounding Ranged tiles. This unit is affected by the Frost Drone, but for now, we’ll have to deal with it.
Next, place Cuora behind the Vanguard, right up against the exit, also facing east. This acts as a safety buffer for stray units, but also sets up for the mid and late-game, where her tankiness is required. Again, she will be affected by the Frost Drone, so we need to take care of it.

Place your single-target (ST) Caster at the blue square, facing north. They should immediately start attacking the Frost Drone. This will take some time, so if the Caster has an attack steroid of some kind, use it on cooldown.

Place your Ranged Attack (RA) Guard at the blue square, facing east. If you’re forced to use Midnight (because you lack Frostleaf or SilverAsh), note that this will take a lot of time, because he will get distracted by oncoming units, and his damage output is low. As long as he stays alive, however, the Frost Drone will eventually go down.

Place your Sniper in the middle Ranged tile, facing north. This will let her focus on the Frost Drone, but also set up for the mid and late-game. This also marks the end of the early game, as Light Armored Soldier Leaders (LASLs) will start spawning in the top lane, and Breakers will start to spawn in the bottom lane.

Mid Game
Once the west-most Frost Drone goes down, put your AOE Caster in the top lane, above Cuora, facing east. Retreat your ST Caster and replace them with a Medic, facing north. There are a lot of units coming, so if they start to bleed through to Cuora, use your AOE Caster’s ability.

After deploying your Medic, save up your Deployment Points and drop that fat 40 cost Jammer right next to the Sniper. If you do not have this deployed by the time the Drones start to rush you, you will likely lose. Also, retreat the two cheap Vanguards you placed on the east most part of the map.
To end the mid-game part of the level, drop your Defender in front of Midnight, facing east, and drop your ST Caster north of the Jammer, facing East. They should start attacking the Frost Drone. Get ready for a lot of visual noise on your screen, because we’re entering the late-game!

Late Game / Wrapping Up
The ending of this level is a zerg rush of zig-zagging Light Drones, punctuated by a few Veteran Butchers trying to cleave their way through your melee units. Don’t panic, but make sure you’re timing your Operator’s cooldowns appropriately!
Once the last Frost Drone is defeated, retreat your ST Caster and replace it with your other Medic, facing west. When the Butchers arrive at your Vanguard, they will likely delete them immediately. Once they start hitting Cuora, activate her ability, and deploy your strongest Vanguard behind the Butchers. Activate any other cooldowns you may have, and you should secure a perfect victory!
Here’s a video showing how it works via Auto-Deploy:
That’s a wrap, Doctors. Do you have an alternate strategy that you use? Different units? Let us know, down below!
Credit to KyoStinV for creating the low-rarity strategy for this, and many other, levels.