So you think the worst is over in Little Nightmares 2? Welcome to the Hospital, a terrifying location and the prime area that Chapter 3 takes place in.
Chapter 3 Walkthrough
When you spawn, head right through the hallways and push the door open on the far end. After Six saves Mono’s life, follow her across the beds. Make sure to take your time when you’re jumping across because it can be a little tricky to line Mono up. Once you reach the floor above, take the fuse out of the control panel and run with it to the other side of the hall. Place the fuse in the right control box to open up the door to the elevator shaft. Upon jumping onto the elevator, it will begin to break so quickly hurry to the front right side. You’ll see a vent that Six and Mono can open up. Lift this up and quickly enter the vent before the elevator crashes.
You’ll emerge in a very dark room where a flashlight is laying in the center. Grab this light to have it permanently added to your inventory. The flashlight can togged on and off by pressing B (Xbox One) Circle (PS4). Additionally, you can move where Mono shines the flashlight with the Right Stick. Proceed into the next hallway with the long row of hospital beds.
Glitching Remains
Before you proceed right, run down the hall of beds. You’ll faintly see the Glitching Remains standing to the right of the door.

Keep going right until you reach another hallway that splits off. Unfortunately, the door on the right is barricaded, so run down the middle hall and enter the room with the lights on. You should see a vending machine against the wall with a lever that Mono can grab. Pulling it down will release a can of soda, which can be thrown at the button to open up the next area. You will have another television tuning section here, so move the Left Stick around until you reach the right frequency three times. Six will save Mono once again and you’ll be free to explore the waiting room.

Waiting Room Key
Instead of going upstairs, head right and keep going past the elevator. You will enter a room with an x-ray machine, which can be turned on by pulling the lever on the right. By the desk, you’ll see a picture of a stuffed animal with a key in it, so go to the playroom on the right.
Hat
Inside the playroom, you will see a large shelf filled with toys on the right. Climb up the shelf to reach the hat on the top.
Despite what the picture would lead you to believe, the key is actually not in the bear. Approach the stuffed rabbit on the right, grab it, and head to the elevator that’s between the x-ray and waiting room. This will take you down to the crematorium, where you can toss the rabbit into and burn it up by pulling the switch on the right.
With the key in hand, head back up the elevator and go to the waiting room. Run up the stairs and hang a right to the locked door. Once you’ve opened it, keep going through the operating room until you reach a long hallway that’s absolutely packed with mannequin parts.
Glitching Remains
In the long hallway filled with manniquen body parts, run to the very end to see a Glitching Remain jumping at a toy duck on the shelf above.

Fuse One
Go towards the camera in this hallway until you reach a door with a broken window. Six will help you up, so go through the door into the room with a mannequin strapped down to a surgical table. Here’s where things get a little intense. Quickly run to the other side of the room and shove the box out of the way. This will cause the hand to reanimate and begin chasing after you. Dash across the floor and climb the metal shelf in front of you. When you drop down on the right, sprint to the other side of the room and jump over the hand that rushes you. Grab the table and hoist yourself up to safety.
See that metal shelf on the right side of the room with the chainlink side? Rush towards that and begin climbing up. Do not stop, as the hand will be in hot pursuit. Enter the vent and follow it to the other end to briefly escape the angry hand. When you land, make your way down the hall and enter the room to your left. You’ll hear the hand running through the vent above you so keep going left until it drops down in front of Mono. Juke it by either moving to the side when it lunges or by jumping over it. Climb onto the table to the left to cause it to skitter off.
Hoist yourself onto the shelf and dropdown. This time, instead of running for the table, grab the hammer and get ready to get some payback. When the hand attacks, wait until it lifts two fingers off the ground. If you swing before this, the hand will dodge your attack. Once both fingers are reared back, bring the hammer down to injure it. Do this two more times to permanently kill the little bastard. Then give it a few more hits for good measure! You can never be too safe. With hammer in hand, push the box on the left away from the door, shatter the glass, and grab the fuse on the table. You will reunite with Six who’s playing with a mannequin arm in the next room.
Fuse Two
Ready for one of the scariest parts of Little Nightmares 2? With the fuse in hand, go back to the waiting room and run to the left side on the second floor. Put the fuse into the control panel to open up the metal gate. Head inside and go down the hallway towards the door with the broken glass. Six will once again help you up, throwing you into a room with a switch and a tall mannequin. Pulling the switch will kill the lights in the room, causing the mannequin to come alive and attack. You will need to lead it to at least the middle of the room. This will give you enough space to run by this creature. Remember to periodically shine your flashlight on it to make it stop moving. This is a very fast enemy, so do not underestimate its ability to quickly close the gap.

Once you’re safely through the grate, keep going down the spooky hallways until you reach a large room with about a half dozen mannequins. Two of these are enemies, so you’ll need to juggle shining your light on them to live. Run towards the one to the left and juke it by going around it. You’ll want to reach the bed on the left side, so keep shining the light on these foes until you reach this area.
A tip for doing these enemies is to move with the Left Stick while manually aiming with the Right Stick. This allows you to move backward while shining a light on the enemies. You’ll want to practice moving and pointing the flashlight around because it’s absolutely necessary for survival.

The next section is a little tougher because you’ll need to micro-manage three mannequins. Move to the middle of the room and run to the left. This will let you avoid being scooped up by the mannequin closest to the screen. There is also one in the back left and another that’s going to be waiting a little off-camera on the left. This part is… annoying. You will need to quickly move to the left side of the room and then towards the back where glass has been broken in a door. Do not just try to run by these enemies, they are too fast and will often catch Mono when he’s climbing. Instead, take it slow and always try to shine your light on more than one mannequin at a time.
After you escape these mannequins, just follow the path until you reach a long hallway where Mono has to run at the camera. As you make your way down the hall, mannequin hands will explode out on either side in an attempt to grab Mono.
Glitching Remains
Before proceeding down the nightmare hall of mannequin arms. Turn around and head towards the large green gated door. You’ll see a hole in the bottom right which Mono can slip through. Now just enter the room on the left to find the Glitching Remain sitting by the hole.
Stay towards the center to avoid being grabbed. Once you reach the end, the door behind you will bust open and some crawling mannequins will attack. Instead of shining your light on them, run for your life. Go right into the next room, quickly crawl under the bed, and then rush the filing cabinets on the right. Climb up them to escape and jump down into the shower room. Grab the switch against the wall to turn the power back on.
Glitching Remains
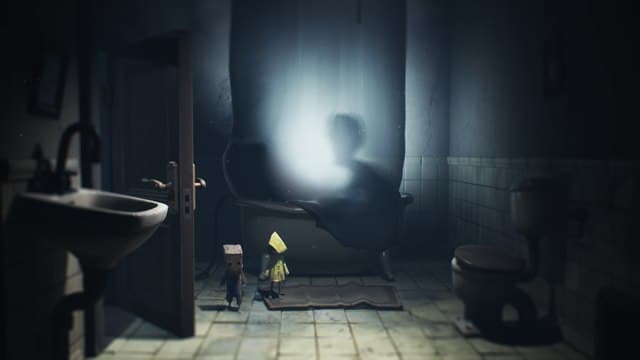
Before you leave the shower room, go to the back left corner and push the box of soap out of the way. This will reveal a vent you can climb through. Following the vent you’ll emerge in a room with a bathtub and a Glitching Remain standing by it.

Approach the gated door, grab a bar of soap, and toss it at the button. Now run back to the lever and turn the power off. Entering the next room will cause the mannequin in the wheelchair to leap out and attack. Shine the light on him, while backstepping into the shower room. Keep the light on this foe until you reach the lever. Throw the power back on, run past this enemy into the next room, and push the wheelchair towards the door.
Proceed into the next room and get ready for one last assault of creepy mannequins. Shine your light on them as you move through the building and do not stop once. The trick to surviving is to move while flashing your light everywhere to briefly stun enemies. You’ll be safe once you crawl through the door into the electroshock therapy room. Now just pull the switch to cause the fuse to pop out, throw it into the container on the door, and exit with Six. Go back to the waiting room and put both fuses into the control boxes to activate the elevator.
The Morgue
When you arrive in the morgue follow the dark, creepy hallway until you reach a room where the door is boarded up. Oh look, the creepy dismembered hands are back, yay… Six will quickly run to a locker to hold back one from escaping. Grab the pipe and repeat the same method of dispatching the hand as before. Wait until it’s about to strike before you bash it with the pipe. After about two hits, the second hand will break out of the locker and attack. Try to maneuver yourself so both hands are right next to one another. This will ensure that you can hit both at the same time. If this isn’t possible, just be ready to juke the second one when it attacks. After both are dead, help Six with the last board to enter the next room.

Now you get to meet the twisted doctor who has been creating the monstrosities above. Sneak through the shelves until you reach a room with an operating table and two boxes. Hide behind the first box until the doctor turns his back to rummage through the shelves. Quietly move across the room to the other box and wait until he moves to the other set of shelves on the left. If you mess up the timing, just wait until he goes back to searching for items before you move. Head through the vent and take cover under one of the beds.
The doctor will bust through the door and crawl into the room. Wait until he heads towards the back of the room before you make your way to the right. You’ll need to grab one of the toys way in the back, so hide under the beds whenever the doctor is near. Once the doctor leaves the back of the room, grab a toy and make your way back to the right side of the room. Toss the toy at the button to open the gate and summon the doctor. Quickly hide under the cart until the doctor leaves the area entirely. Now just approach the cabinets on the right, climb up, and make your way through the vent.

Morgue Key
When you drop into this part of the morgue you’ll be tasked with finding a key. Approach the locker next to the one that’s open and pull it out. Climb into the box so Six can push you onto the other side. Now pull out the locker in the back right corner before going to the other side of the table. Pull out the lower locker, climb onto the corpse, and grab the locker above you. Now just climb across the bodies you pulled out so you can reach the top left shelf. You can now grab the key to unlock the door in the next room.
Hat
The last hat in Chapter 3 is in the room above. By the long table in the middle, you will see a row of lockers along the floor. Approach the cloest one to the table on the left. Pull it open to reveal the bandage hat.
Morgue Fuse
You didn’t think you were done with the doctor, right? Crawl into the vent on the left and hide under the big table in the center until the doctor’s back is turned. Move under the wooden table on the left and just chill there for a moment. Once the doctor is distracted, run to the raised vent on the left and have Six give you a boost through. You’ll see someone struggling to live in a hospital bed, along with a ladder leading to the roof. Climb up the ladder to the roof and drop down on the lever to the left. This will cause the patient to flatline, beckoning the doctor over to you. Hide under the bed or small table until you can slip away into the other room.
Pull out the corpse and use it to climb up to the fuse above you in the back right. Take the fuse to the door and slot it in. This will cause the doctor to give chase, so run through the door the second it opens. Do not hide under the bed, the doctor will catch you. Instead just run down the hall until you reach an area with a massive furnace. Climb up into the furnace so the doctor will chase you. Wade through the ashes and exit out the vent that Six is opening. She will slam the door shut on the doctor, letting you pull the switch to cook him alive. Now pull the lever by the elevator to escape the hospital.
Now it’s time to venture into the Pale City. Here’s our complete Chapter 4 walkthrough.